- {{ term.title || term.reference }}
Deployd modules are 100% compatible with regular node modules. This means you can use any of the 17,000+ node modules when building your Deployd app.
Any module in your app's node_modules folder will be loaded when the Deployd server starts.
You don't have to require() or load anything to instantiate your module. The following will log 'hello world' when you run dpd.
// /my-app/node_modules/hello.js
console.log('hello world');
In order to do anything interesting you need a reference to the current Deployd server object. The server is always available at process.server. This means you don't need to require anything to use most of the internal APIs.
The simplest kind of module is a one-off module. These are easy to create but hard to reuse. Typically any behavior that is specific to just your app that can't be implemented using an existing module can be built with a simple one-off module.
Here's an example one off module that maintains a count of requests to the url /hits and writes it to a file every minute.
// /my-app/node_modules/hits.js
var fs = require('fs');
process.server.hits = 0;

process.server.on('request', function(req) {
  if(req.url === '/hits') {
    process.server.hits++;
  }
});

// write a file every minute
setInterval(function() {
  fs.writeFile('hits.json', JSON.stringify({hits: process.server.hits}));
}, 60000);
Modules can also expose useful APIs of their own. The simplest way to create reusable modules is to define a Resource Type. Resource Types are exposed in the dashboard and are much easier to reuse, and you can share them with other Deployd developers. See the custom resource type guide for more info.
Deployd modules can register new Resource Types, which can be created with a route and configured per instance. Deployd comes with two built-in Resource Types: "Collection" and "User Collection". You can create your own custom resource types by extending the Resource constructor and implementing a handle() method. Deployd will automatically load any Resource Types that are exported by a module.
Here is a simple custom resource type:
var Resource = require('deployd/lib/resource')
    , util = require('util');

function Hello(name, options) {
    Resource.apply(this, arguments);
}
util.inherits(Hello, Resource);
module.exports = Hello;

Hello.prototype.clientGeneration = true;

Hello.prototype.handle = function (ctx, next) {
    if(ctx.req && ctx.req.method !== 'GET') return next();

    ctx.done(null, {hello: 'world'});
}
This will allow you to add a "Hello" resource in the Dashboard. This resource will respond to every GET request with {"hello": "world"}.
The most basic Custom Resource Type that is useful is the Event Resource, which will simply execute an On GET event when it receives a GET request and an On POST event when it receives a POST request.
This is the source for that module:
var Resource = require('deployd/lib/resource')
    , util = require('util');

function EventResource() {
    Resource.apply(this, arguments);
}
util.inherits(EventResource, Resource);

EventResource.label = "Event";
EventResource.events = ["get", "post"];

module.exports = EventResource;

EventResource.prototype.clientGeneration = true;

EventResource.prototype.handle = function (ctx, next) {
    var parts = ctx.url.split('/').filter(function(p) { return p; });

    var result = {};

    var domain = {
            url: ctx.url
        , parts: parts
        , query: ctx.query
        , body: ctx.body
        , 'this': result
        , setResult: function(val) {
            result = val;
        }
    };

    if (ctx.method === "POST" && this.events.post) {
        this.events.post.run(ctx, domain, function(err) {
            ctx.done(err, result);
        });
    } else if (ctx.method === "GET" && this.events.get) {
        this.events.get.run(ctx, domain, function(err) {
            ctx.done(err, domain.result);
        });
    } else {
        next();
    }
};
Let's look at it line-by-line:
var Resource = require('deployd/lib/resource')
    , util = require('util');
To create a Resource, you'll need the Resource module and Node's util module.
function EventResource() {
    Resource.apply(this, arguments);
}
Creates the constructor for the EventResource, also applying the base Resource constructor.
util.inherits(EventResource, Resource);
Causes EventResource to inherit its prototype from Resource using Node's util.inherits() function.
EventResource.label = "Event";
Changes the Resource.label property to set how the EventResource appears in the "Add Resource" menu in the Dashboard. Without this setting, it would appear using the constructor name, EventResource.
EventResource.events = ["get", "post"];
Configures two events for the Resource type: get and post. These will appear on the "Events" page in the Dashboard with no extra configuration.
Note: The Dashboard provides the "On" prefix, e.g. "On Get"
module.exports = EventResource;
Exports the EventResource constructor. This is how Deployd finds and loads the resource type.
EventResource.prototype.clientGeneration = true;
Sets the clientGeneration flag, which ensures that resources created with this resource type will be generated into dpd.js.
EventResource.prototype.handle = function (ctx, next) {
Defines a handle() function. This function will be called whenever a request is routed to this resource. The ctx object is a Context, which includes useful properties (body, query, etc.) and functions (particularly done()) to simplify working with HTTP.
The next function gives control back to the router.
var parts = ctx.url.split('/').filter(function(p) { return p; });

var result = {};
Set up some local variables; parts is an array of the /-separated parts in the URL.
var domain = {
        url: ctx.url
    , parts: parts
    , query: ctx.query
    , body: ctx.body
    , 'this': result
    , setResult: function(val) {
        result = val;
    }
};
Create a domain for the events. These are objects and functions that will be accessible from the event. Notice that the setResult function is a closure that assigns its argument to the local result variable.
if (ctx.method === "POST" && this.events.post) {
    this.events.post.run(ctx, domain, function(err) {
        ctx.done(err, result);
    });
}
Run the POST event using the Script.run() function if applicable, passing it the current context and domain.
The this.events object contains all of the available events; if the user has not written a POST event, though, this.events.post might be null.
The callback for Script.run returns an error err if something went wrong in the script (or if the script writer called cancel())
Finally, call ctx.done() with both the error and result (result is the local variable we set up earlier which the scriptwriter can change using setResult(). The response body is always the second parameter, but it is ignored if an error is passed.
} else if (ctx.method === "GET" && this.events.get) {
    this.events.get.run(ctx, domain, function(err) {
        ctx.done(err, domain.result);
    });
}
Do the same thing for the GET event.
} else {
    next();
}
If no event applies, call next(). This tells the router that this resource cannot handle the current request, and the router will allow other resources to handle it. If every resource calls next(), then Deployd will return a 404 status code.
This module demonstrates how to use a Node module such as Nodemailer to make a reusable resource type.
For information on how to use this module in your app, see the Email Resource documentation.
This module demonstrates how to run user-defined Events in your resource. See the Creating Custom Resource Types page for an analysis of the source.
For information on how to use this module in your app, see the Event Resource documentation.
This module demonstrates how to receive file uploads in a custom resource type.
For information on how to use this module in your app, see the S3 Bucket Resource documentation.
Collections are the most common Resource Type in Deployd. They allow the user to store and load data from their app's Store. Behind the scenes, they validate incoming requests and execute event scripts for get, post, put, delete, and validate. If all event scripts execute without error (or cancel()ing), the request is proxied to the collection's Store.
A Collection inherits from Resource. Any constructor that inherits from Collection must include its own Collection.external prototype object.
Example inheriting from Collection:
var Collection = require('deployd/lib/resources/collection');
var util = require('util');

function MyCollection(name, options) {
  Collection.apply(this, arguments);
}
MyCollection.external = Collection.external;

util.inherits(MyCollection, Collection);
The backing persistence abstraction layer. Supports saving and reading data from a database. See Store for more info.
Validate the request body against the Collection's properties
and return an object containing any errors.
body {Object}The object to validate
create {Boolean}Should validate a new object being created
errors {Object}Sanitize the request body against the Collection's properties
object and return an object containing only properties that exist in the
collection.config.properties object.
body {Object}sanitized {Object}Sanitize the request query against the collection.properties
and return an object containing only properties that exist in the
collection.properties object.
query {Object}sanitizedQuery {Object}Parse the ctx.url for an id. Override this to change how an object's id is parsed out of a url.
ctx {Context}Find all the objects in a collection that match the given ctx.query. Then execute a get event script, if one exists, using each object found. Finally call fn(err) passing an error if one occurred.
ctx {Context}fn(err)Execute a delete event script, if one exists, using each object found. Then remove a single object that matches the ctx.query.id. Finally call fn(err) passing an error if one occurred.
ctx {Context}fn(err)First execute a validate event script if one exists. If the event does not error, try to save the ctx.body into the store. If ctx.body.id exists, perform an update and execute the put event script. Otherwise perform an insert and execute the post event script. Finally call fn(err), passing an error if one occurred.
ctx {Context}fn(err)Contexts are a thin abstraction between http requests, Resources, and Scripts. They provide utility methods to simplify interacting with node's http.ServerRequest and http.ServerResponse objects.
A Context is built from a request and response and passed to a matching Resource by the Router. This might originate from an external http request or a call to an internal client from a Script.
Contexts may be created without a real request and response such as during an internal request using the dpd object. See Internal Client for more info.
var Context = require('deployd/lib/context');
var ctx = new Context(resource, req, res, server);
Continuous callback sugar for easily calling res.end(). Conforms to the idiomatic callback signature for most node APIs. It can be passed directly to most APIs that require a callback in node.
fs.readFile('bar.txt', ctx.done);
err {Error | Object}An error if one occurred during handling of the ctx. Otherwise it should be null.
result {Object}The result of executing the ctx. This should be an object that is serializable as JSON.
The body of the request if sent as application/json or application/x-www-form-urlencoded.
The query string of the request serialized as an Object. Supports both ?key=value as well as ?{"key":"value"}.
A Script provides a mechanism to run JavaScript source in a sandbox. A Script is executed with a Context and a domain object using the node vm module. Each Script runs independently. They do not share global scope or state with other scripts or modules.
Scripts can be run in an async mode. This mode is triggered when a Script is run(ctx, domain, fn) with a callback (fn). When run in this mode a Script will try scrub all functions in the domain for operations that require a callback. If a callback is required, the function is re-written to count the callbacks completion and notify the script. When all pending callbacks are complete the script is considered finished.
If a script is run with a callback (in async mode), any error will emit an internal error event. This will stop the execution of the script and pass the error to the script's callback.
var Script = require('deployd/lib/script');
var script = new Script('hello()', 'hello.js');
A Script's source is compiled when its constructor is called. It can be run() many times with independent Contexts and domains.
A Context with a session, query, req and res.
An Object containing functions to be injected into the Scripts sandbox. This will override any existing functions or objects in the Scripts sandbox / global scope.
This example domain provides a log function to a script.
var script = new Script('log("hello world")');
var context = {};
var domain = {};
var msg;

domain.log = function(str) {
  console.log(msg = str);
}

script.run(ctx, domain, function(err) {
  console.log(msg); // 'hello world'
});
If a callback is provided the script will be run in async mode. The callback will receive any error even if the error occurs asynchronously. Otherwise it will be called without any arguments when the script is finished executing (see: async mode).
var s = new Script('setTimeout(function() { throw "test err" }, 22)');

// give the script access to setTimeout
var domain = {setTimeout: setTimeout};

s.run({}, domain, function (e) {
  console.log(e); // test err
});
path {String}
fn(err, script)
Load a new script at the given file path. Runs the callback with an error if one occurred, or a new Script loaded from the contents of the file.
Scripts are executed with a default sandbox and set of domain functions. These are functions that every Script usually needs, and are available to every Script. These can be overridden by passing a value such as {cancel: ...} in a domain. See Event API for Custom Resources for documentation on this default domain.
The internal-client module is responsible for building a server-side version of dpd.js. It is intended for use in Scripts but can be used by resources to access other resources' REST APIs.
Note: As in dpd.js, the callback for an internal client request receives the arguments (data, err), which is different than the Node convention of (err, data).
var internalClient = require('deployd/lib/internal-client');

process.server.on('listening', function() {
  var dpd = internalClient.build(process.server);
  dpd.todos.get(function(data, err) {
    // Do something
  });
});
server {Server}The Deployd server to build a client for.
session {Session} (optional)The Session object on the current request.
stack {Array} (optional)Used internally to prevent recursive calls to resources.
In order to make requests on resources within the Deployd server, internal-client creates mock req and res objects. These objects are not Streams and cannot be treated exactly like the standard http.ServerRequest and http.ServerResponse objects in Node, but they imitate their interfaces with the following properties:
url {String}The URL of the request, i.e. "/hello"
method {String}The method of the request, i.e. "GET", "POST"
query {Object}The query object.
body {Object}The body of the request.
session {Session}The current session, if any.
internal {Boolean}Always equal to true to indicate an internal request and a mock req object.
statusCode {Number}Set this to a standard HTTP response code.
setHeader() {Function}No-op.
end(data) {Function}Returns data to the internal client call. If data is JSON, it will be parsed into an object, otherwise it will simply be passed as a string. If the res.statusCode is not 200 or 204, data will be passed as an error.
internal {Boolean}Always equal to true to indicate an internal request and a mock res object.
Resources are the building block of a Deployd app. They provide a way to handle http requests at a root url. They must implement a handle(ctx, next) method that either handles a request or calls next() to give the request back to the router.
Resources can also be attributed with meta-data to allow the dashboard to dynamically render an editor gui for configuring a resource instance.
A Resource can execute Scripts during the handling of an http request when certain events occur. This allows users of the resource to inject logic during specific events during an http request without having to extend the resource or create their own.
For example, the Collection resource executes the get.js event script when it retrieves each object from its store. If a get.js file exists in the instance folder of a resource (eg. /my-project/resources/my-collection/get.js), it will be pulled in by the resource and exposed as myResource.scripts.get.
A Resource inherits from EventEmitter. The following events are available.
changed after a resource config has changeddeleted after a resource config has been deletedInheriting from Resource:
var Resource = require('deployd/lib/resource')
  , util = require('util');

function MyResource(name, options) {
  // run the parent constructor
  // before using any properties/methods
  Resource.apply(this, arguments);
}
util.inherits(MyResource, Resource);
module.exports = MyResource;
name {String}The name of the resource.
options {Object}
configPath the project relative path to the resource instancepath the base path a resource should handledb (optional) the database a resource will use for persistenceconfig the instance configuration objectserver the server objectThe following resource would respond with a file at the url /my-file.html.
function MyFileResource(name, options) {
  Resource.apply(this, arguments);

  this.on('changed', function(config) {
    console.log('MyFileResource changed', config);
  });
}
util.inherits(MyFileResource, Resource);

MyFileResource.prototype.handle = function (ctx, next) {
  if (ctx.url === '/my-file.html') {
    fs.createReadStream('my-file.html').pipe(ctx.res);
  } else {
    next();
  }
}
Certain methods on a Resource prototype are called by the runtime. Their default behavior should be overridden to define an inherited Resources behavior.
Handle an incoming request. This gets called by the router.
The resource can either handle this context and call ctx.done(err, obj) with an error or result JSON object, or call next() to give the context back to the router. If a resource calls next() the router might find another match for the request, or respond with a 404.
The http context created by the Router. This provides an abstraction between the actual request and response. A Resource should call ctx.done or pipe to ctx.res if it can handle a request. Otherwise it should call next().
Override the handle method to return a string:
function MyResource(settings) {
  Resource.apply(this, arguments);
}
util.inherits(MyResource, Resource);

MyResource.prototype.handle = function (ctx, next) {
  // respond with the file contents (or an error if one occurs)
  fs.readFile('myfile.txt', ctx.done);
}
Load any dependencies and call fn(err) with any errors that occur. This is automatically called by the runtime to support asynchronous construction of a resource (such as loading files).
Note: If this method is overridden, the super method must be called to support loading of the MyResource.events array.
If true, ensures that this resource is included in dpd.js.
MyResource.prototype.clientGeneration = true;
The instance configuration object; used to access the resource's configuration from member functions.
MyResource.prototype.handle = function (ctx, next) {
  fs.readFile(this.config.filePath, ctx.done);
}
This is a special type of prototype object that is used to build the dpd object. Each function on the Resource.external prototype Object are exposed externally in two places
dpd.js browser JavaScript clientContext.dpd object generated for inter-resource callsHere is an example of a simple resource that exposes a method on the external prototype.
/my-project/node_modules/example.js
var util = require('util');
var Resource = require('deployd/lib/resource');
function Example(name, options) {
  Resource.apply(this, arguments);
}
util.inherits(Example, Resource);

Example.external = {};

Example.external.hello = function(options, ctx, fn) {
  console.log(options.msg); // 'hello world'
}
When the hello() method is called, a context does not need to be provided as the dpd object is built with a context. A callback may be provided which will be executed with results of fn(err, result).
/my-project/public/hello.js
dpd.example.hello({msg: 'hello world'});
/my-project/resources/other-resource/get.js
dpd.example.hello({msg: 'hello world'});
If a Resource constructor includes an array of events, it will try to load the scripts in its instance folder (eg. /my-project/resources/my-resource/get.js) using resource.loadScripts(eventNames, fn).
MyResource.events = ['get'];
This will be available to each instance of this resource as this.events.
/my-project/node_modules/my-resource.js
MyResource.prototype.handle = function(ctx, next) {
  if(this.events && this.events.get) {
    var domain = {
      say: function(msg) {
        console.log(msg); // 'hello world'
      }
    }
    this.events.get.run(ctx, domain, ctx.done);
  }
}
/my-project/resources/my-resource/get.js
say('hello world');
The resource type's name as it appears in the dashboard. If this is not set, it will appear with its constructor name.
Hello.label = 'Hello World';
The default path suggested to users creating a resource. If this is not set, it will use the constructor's name in lowercase.
Hello.defaultPath = '/hello-world';
Set this property to an object to create a custom configuration page for your resource type.
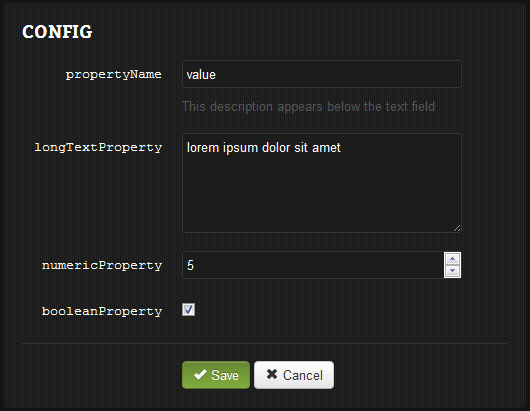
settings - An array of objects describing which properties to display. name - The name of the property. This is how the value will be passed into the config object, so make sure it's something JavaScript-friendly, e.g. maxItems.type - The type of control to edit this property. Allowed types are text, textarea, number, and checkbox.description (Optional) - Explanatory text to appear below the field.Hello.basicDashboard = {
settings: [{
name: 'propertyName',
type: 'text',
description: "This description appears below the text field"
}, {
name: 'longTextProperty',
type: 'textarea'
}, {
name: 'numericProperty',
type: 'number'
}, {
name: 'booleanProperty',
type: 'checkbox'
}]
};
The above sample will produce the following dashboard page:
A resource can describe the dependencies of a fully custom dashboard editor UI. This will be passed to the dashboard during rendering to create a custom UI.
This example creates the custom dashboard for the Collection resource. It automatically includes pages and page-specific scripts:
Collection.dashboard = {
    path: path.join(__dirname, 'dashboard')
  , pages: ['Properties', 'Data', 'Events', 'API']
  , scripts: [
      '/js/ui.js'
    , '/js/util.js'
  ]
}
path {String}The absolute path to this resource's dashboard
pages {Array} (optional)An array of pages to appear in the sidebar. If this is not provided, the only page available will be "Config" (and "Events", if MyResource.events is set).
The dashboard will load content from [current-page].html and js/[current-page].js.
Note: The "Config" page will load from index.html and js/index.js.
scripts {Array} (optional)An array of extra JavaScript files to load with the dashboard pages.
When you request a page from a custom dashboard, it will load the following files, if they are available, from the dashboard.path:
[current-page].htmljs/[current-page].jsstyle.cssThe default page is index; the config page will also redirect to index.
The config or index page will load the basic dashboard if no index.html file is provided.
The events page will load the default event editor if no events.html file is provided.
It will also load the JavaScript files in the dashboard.scripts property.
To embed the event editor in your dashboard, include this empty div:
<div id="event-editor" class="default-editor"></div>
The dashboard provides several JavaScript libraries by default:
ace/theme/deployd)Within the dashboard, a Context object is available:
//Automatically generated by Deployd:
window.Context = {
  resourceId: '/hello', // The id of the current resource
  resourceType: 'Hello', // The type of the current resource
  page: 'properties', // The current page, in multi-page dashboards
  basicDashboard: {} // The configuration of the basic dashboard
};
You can use this to query the current resource:
dpd(Context.resourceId).get(function(result, err) {
  //Do something
});
In the dashboard, you also have access to the special __resources resource, which lets you update your app's configuration files:
// Get the config for the current resource
dpd('__resources').get(Context.resourceId, function(result, err) {
  //Do something
});

// Set a property for the current resource
dpd('__resources').put(Context.resourceId, {someProperty: true}, function(result, err) {
  //Do something
});

// Set all properties for the current resource, deleting any that are not provided
dpd('__resources').put(Context.resourceId, {someProperty: true, $setAll: true}, function(result, err) {
  //Do something
});

// Save another file, which will be loaded by the resource
dpd('__resources').post(Context.resourceId + '/content.md', {value: "# Hello World!"}, function(result, err)) {
  //Do something
});
Deployd's Server extends node's http.Server. A Server is created with an options object that tells Deployd what port to serve on and which database to connect to.
The Server object is also the main entry point for modules. After it is started, the Server instance is available at process.server.
Servers are created when calling the Deployd exported function.
var deployd = require('deployd')
  , options = {port: 3000}
  , server = deployd(options);
options {Object}
port {Number} - the port to listen ondb {Object} - the database to connect todb.connectionString {String} - The URI of the mongoDB using standard Connection String. If db.connectionString is set, the other db options are ignored.port {Number} - the port of the database serverhost {String} - the ip or domain of the database servername {String} - the name of the databasecredentials {Object} - credentials for the server
username {String}password {String}env {String} - the environment to run in.Note: If options.env is "development", the dashboard will not require authentication and configuration will not be cached. Make sure to change this to "production" or something similar when deploying.
Load any configuration and start listening for incoming connections.
var dpd = require('deployd')
  , server = dpd()

dpd.listen();
dpd.on('listening', function() {
  console.log(server.options.port); // 2403
});
Create a new Store for persisting data using the database info that was passed to the server when it was created.
// Create a new server
var server = new Server({port: 3000, db: {host: 'localhost', port: 27015, name: 'my-db'}});

// Attach a store to the server
var todos = server.createStore('todos');

// Use the store to CRUD data
todos.insert({name: 'go to the store', done: true}, ...); // see `Store` for more info
An Array of the server's Resource instances. These are built from the config and type loaders.
deployd.attach can attach Server Class functions into a regular http server. It also provide handleRequest function to act as express middleware.
var deployd = require('deployd')
  , options = {}
  , server = require('http').createServer(app)
  , server = deployd.attach(server, options);
options {Object}
socketIo {Object} - socket.io instancedb {Object} - the database to connect toport {Number} - the port of the database serverhost {String} - the ip or domain of the database servername {String} - the name of the databasecredentials {Object} - credentials for the server
username {String}password {String}env {String} - the environment to run in.Note: If options.env is "development", the dashboard will not require authentication and configuration will not be cached. Make sure to change this to "production" or something similar when deploying.
An in-memory representation of a client or user connection that can be saved to disk. Data will be passed around via a Context to resources.
A store for persisting sessions in-between connection and disconnection. Automatically creates session IDs on inserted objects.
var session = new Session({id: 'my-sid', new SessionStore('sessions', db)});
session.set({uid: 'my-uid'}).save();
data {Object} The data used to construct the session.
store {SessionStore} The store used to persist the session.
sockets {Socket.IO.sockets} The Socket.IO sockets object used to attach an existing socket.
fn(err, data) {Function} optionalSave the in memory representation of a session to its store.
fn(err, data) {Function} optionalReset the session using the data persisted in its store.
event {String}The event to emit to all session's sockets.
data {Object} optionalThe data to send to sockets listening to the given event.
collection {Collection}The user-collection instance (eg. dpd.todos) to use to find users.
query {Object}Only emit the event to users that match this query.
event {String}The event to emit to all session's sockets.
data {Object} optionalThe data to send to sockets listening to the given event.
Sessions are persisted in a modified store. This store has several methods to help create and manage sessions.
A store for persisting sessions in-between connection and disconnection. Automatically creates session IDs on inserted objects.
var db = process.server.db;
var sockets = process.server.sockets;
var name = 'sessions';
var store = new SessionStore(name, db, sockets);
name {String} The name of the db store.
db {Db} The server db instance
sockets {Socket.IO.sockets} The socket.io sockets object.
sid {String} optionalAn existing session id.
fn(err, session) {Function}Called once the session has been created.
An abstraction of a collection of objects in a database. Collections are HTTP wrappers around a Store. You can access or create a store the same way.
var myStore = process.server.createStore('my-store');
You shouldn't construct Stores directly. Instead use the process.server.createStore() method.
object {Object}The data to insert into the store.
fn(err, result) {Function}Called once the insert operation is finished.
query {Object}Only count objects that match this query.
fn(err, count) {Function}Called once the count operation is finished. count is a number.
query {Object}Only returns objects that match this query.
fn(err, results) {Function}Called once the find operation is finished.
query {Object}
fn(err, result) {Function}
Find the first object in the store that match the given query.
query {Object}
changes {Object}
fn(err, updated) {Function}
Update an object or objects in the store that match the given query only modifying the values in the given changes object.
query {Object}
fn(err, updated) {Function}
Remove an object or objects in the store that match the given query.
Let us know if you have any ideas to improve our docs. Open an issue on github, send us an email, or tweet us.
This entire site, including documentation written in markdown is available on github. Pull requests are appreciated!