- {{ term.title || term.reference }}
Yes. See the deploying to your own server guide for more info.
Yes, you can use Deployd as a JSON API over HTTP.
Yes, Deployd is unopinionated on the front-end and you can use any libraries that you like. For frameworks that provide their own AJAX implementation (particularly Backbone), you should probably use the HTTP API rather than dpd.js in most cases. Dpd.js is still useful for realtime and user authentication, as most of those frameworks don't provide any built-in way to do this.
If you're interested, some of Deployd.com (such as the community page and the documentation's search feature) was built with AngularJS and certain parts of the Dashboard (such as the data and property editor) were built with Knockout.
Yes and no. Deployd is often compared to Meteor, since they are similar in several ways:
However, they are different in a few significant ways:
Deployd and Meteor solve many of the same problems in very different ways. You should try both frameworks to see which one better meets your needs.
In the future, the two frameworks may not be mutually exclusive. Deployd focuses on data management and business logic while Meteor focuses on front-end rendering in real time; it may be possible to integrate the two for the best of both worlds.
In a tool like Deployd, where its purpose is to provide ready-made functionality, a lot of configuration is necessary to make sure the end result behaves the way you need it to. We didn’t want to send users to a configuration file, though. That’s not inspiring, and it’s tedious. When you’re making an app, it should feel like you’re creating something, not just selecting values.
Some frameworks bypass this by allowing you to configure the app with code. In Deployd, you might have created your API by writing a class that inherits from a Collection base class. This is better than writing configuration files, but ultimately it leads to a lot of boilerplate code. In a Convention Over Configuration environment, when you want to use the default functionality, you write an essentially empty file. When you want to override the default functionality, you write everything from scratch.
Our solution is the Dashboard. Simply put, it’s a web-based IDE for Deployd configuration files. It’s an expressive interface that lets you create your app’s API visually.
Though we didn’t want to have our users write code for the structural setup that’s better handled in a custom interface, we realized that we can’t have users add business logic in this way. Business logic is different for every app, and we can’t account for every use case.
At the same time, we can’t force business logic out of the server-side and onto the client; that would leave your app open to attack by people who figure out your API.
We decided that there’s no better way to define logic than by writing code, so we made Deployd scriptable. By writing events, or hooks into the default functionality (such as creating objects, updating them, and querying them), you can create almost any app with any rules: validation, security, query optimizations, relationships, and more.
We call Deployd an API Engine - because we think its closest relative is actually a video game engine.
A game engine assumes that every game has levels (or maps, or rooms, or scenes) which contain game objects, which need to be rendered to the screen and interact with each other. Most engines have a level editor, where you can build up these levels without any programming or code generation; when you’re finished with your level, it’s not exactly a playable game, but it works and you can walk around in a map that you built - this is the creation over configuration principle in effect.
Similarly, Deployd assumes that every API you build has collections of data objects which need to support CRUD operations, (Create, Read, Update, Delete). Collections are created in Deployd's version of a level editor called the dashboard.
Continuing with the analogy, a game engine also knows that your game will need things like collision detection and movement, but it doesn’t know exactly how you want to implement that, so it allows you to write scripts at strategic points like “on collision” or “on tick”.
How a rocket is rendered to the screen is pretty consistent for any game, but what happens when that rocket hits an enemy is always different, so you write the latter behavior as a short script, and the game engine runs it at the right time. This strategy spares you from boilerplate without taking away the power and flexibility of writing custom code.
In Deployd, the low-level, redundant parts are routing and database access, so those are built into the core and you don’t have to worry about them. Business logic, which is different for every app, is scripted in Events - hooks into the CRUD operations.
For some people, this isn’t the right approach for a final app; they prefer to have full control over the backend to tweak the performance and low-level functionality as they see fit and feel uncomfortable being limited to business logic. (Many game developers choose not to use a game engine and prefer a lower-level rendering library for virtually the same reasons) In those cases, we recommend Deployd as a prototyping tool rather than a full backend framework.
For the developers who prefer to spend their time building user interfaces, though, the scriptable engine approach is liberating.
Download the latest OSX installer.
If everything installed correctly you should be able to open a terminal (/Applications/Utilities/Terminal.app) and type the following:
dpd -V
If you see something like 0.6.8 then Deployd has been successfully installed.
The terminal is not able to find the dpd program. There are a couple things you can try:
/usr/local/deployd/bin to your PATH (instructions)Download the latest Windows installer.
To verify that Deployd installed correctly, open a command prompt (Windows-R, cmd) and type dpd -V. You should see a version number such as 0.6.8.
Windows is unable to find the dpd command line tool. There are a couple of things you can try:
cmd windowC:\Program Files (x86)\Deployd\binC:\Program Files\Deployd\bin.$ is not part of the syntax for the dpd command; it's only used as a placeholder for the command prompt throughout the Deployd documentation. If you see something like this:
$ dpd create my-app
You only need to type dpd create my-app.
You can install Deployd as a node module using npm. Just run the following:
npm install deployd -g
The dpd program should be available. Try dpd -V.
You can download the latest source here or on github.
git clone https://github.com/deployd/deployd.git
npm install
npm link
You must have mongod 2.0.x and node 0.8.x installed and available in your PATH.
If you haven't already, install Deployd.
You can create a new project by running the following commands in your terminal/command prompt (using terminal on mac / cmd on windows).
dpd create hello-world
cd hello-world
dpd -d
This will create your API, run Deployd, and open up your dashboard.
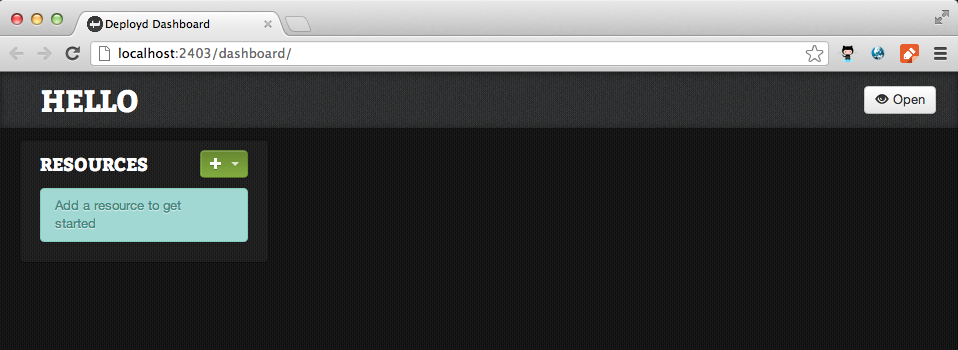
Create a new collection by selecting it from the Resource + dropdown. In the "Create New Collection" prompt, enter /things.
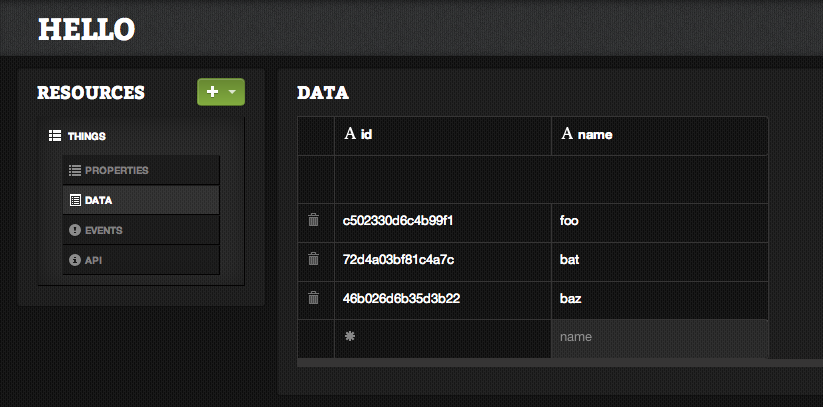
Give your 'things' collection a property of name and press enter. Note - Most screens in the dashboard have keyboard shortcuts.
Add some data to the collection by opening up the data editor. Click the "Data" menu item under "Things". With the data editor open and the new row selected, you can just start typing a name. Type "foo", then hit enter, "bat", enter, "baz", enter.
Now you should have a data editor that looks like this.
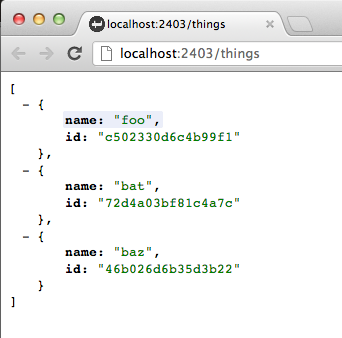
Click the "API" menu item to see documentation for accessing your collection. If you open up http://localhost:2403/things in a browser, you should see the following JSON:
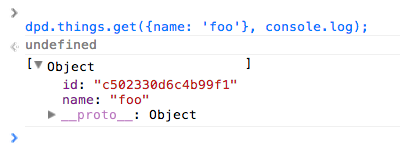
Open up http://localhost:2403 in your browser and pull up your console. Try the following:
dpd.things.get(console.log);
dpd.things.get({$limit: 1}, console.log);
dpd.things.get({name: 'foo'}, console.log);
You should see something like the following:
Deployd uses debug to log requests and show other internal debug info. Check how to use it under The "dpd" Command Line Tool, and Creating a Module.
In this tutorial, you'll see how to create a simple app from the ground up in Deployd. This tutorial assumes a working knowledge of jQuery. It doesn't assume any knowledge of Deployd, but it's recommended to read Your First API with Deployd if you haven't already.
Create a new app in the command line:
$ dpd create comments
$ cd comments
Using your text editor of choice, replace the default index.html file in the public folder:
<!DOCTYPE html>
<html>
<head>
    <title>Deployd Tutorial</title>
    <style type="text/css">
        body { font-size: 16pt; }
        .container { width: 960px; margin-left: auto; margin-right: auto; }
        form { border: #cccccc 1px solid; padding: 20px; margin-bottom: 10px; -moz-border-radius: 5px; -webkit-border-radius: 5px; border-radius: 5px; }
        .form-element { margin-bottom: 10px; }
        #refresh-btn { margin-bottom: 20px; }
        .comment { padding: 10px; margin-bottom: 10px; border-bottom: #cccccc 1px solid; }
        .comment .links { float: right; }
        .comment .links a { margin-left: 10px; }
        .comment .author { font-style: italic; }
    </style>
</head>
<body>
    <div class="container">
        <div id="comments">
        </div>
        <form id="comment-form">
            <div class="form-element">
                <label for="name">Name: </label>
                <input type="text" id="name" name="name" />
            </div>
            <div class="form-element">
                <textarea id="comment" name="comment" rows="5" cols="50">
                </textarea>
            </div>
            <div class="form-element">
                <button type="submit">Add New Comment</button>
            </div>
        </form>
    </div>

    <script src="http://code.jquery.com/jquery-latest.min.js"></script>
    <script type="text/javascript" src="script.js"></script>
</body>
</html>
Also add a file script.js and paste this code:
$(document).ready(function() {

    $('#comment-form').submit(function() {
        //Get the data from the form
        var name = $('#name').val();
        var comment = $('#comment').val();

        //Clear the form elements
        $('#name').val('');
        $('#comment').val('');

        addComment({
            name: name,
            comment: comment
        });

        return false;
    });

    function addComment(comment) {
        $('<div class="comment">')
            .append('<div class="author">Posted by: ' + comment.name + '</div>')
            .append('<p>' + comment.comment + '</p>')
            .appendTo('#comments');
    }

});
Run the app:
$ dpd --open
dpd>
The open command will automatically open http://localhost:2403 in your browser.
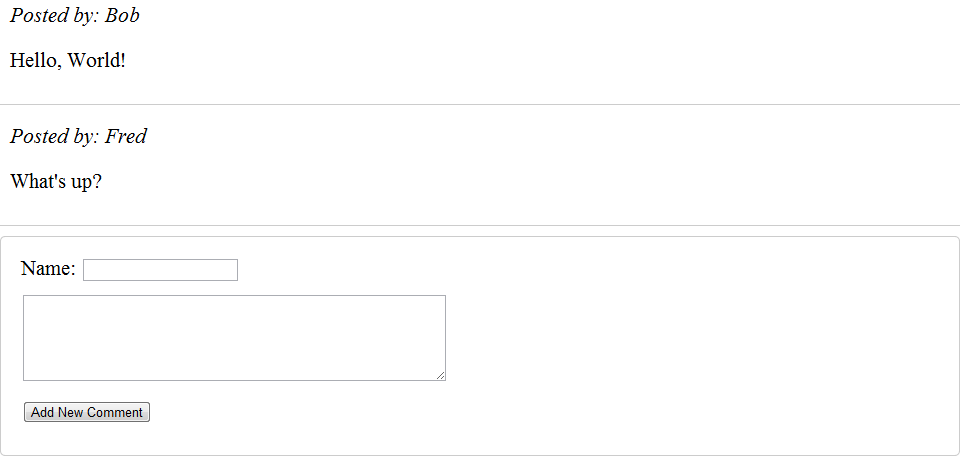
This basic app asks for a name and message body to post a comment. Take a moment to read the code and see how it works.
Next, we'll add a Deployd backend to this app, so that users can interact with each other and post comments.
Open the dashboard by typing dashboard into the dpd> prompt.
/comments.name and comment.That's all you have to do in the backend for now!
In index.html, add the following script reference in between jQuery and script.js (near line 37):
<script type="text/javascript" src="/dpd.js"></script>
This will add a reference to dpd.js, a simple library dynamically built specifically for your app's backend. Dpd.js will automatically detect what resources you have added to your app and add them to the dpd object. Each resource object has asynchronous functions to communicate with your Deployd app.
In script.js, add a loadComments() function inside of $(document).ready:
function loadComments() {
    dpd.comments.get(function(comments, error) { //Use dpd.js to access the API
        $('#comments').empty(); //Empty the list
        comments.forEach(function(comment) { //Loop through the result
            addComment(comment); //Add it to the DOM.
        });
    });
}
And call it when the page loads:
$(document).ready(function() {

    loadComments();

    //...

});
If you run the app now, you should see the comments that you created in the Dashboard.
The get() function that makes this work sends an HTTP GET request to /comments, and returns an array of objects in the resource. There's nothing magical happening in dpd.js; you can use standard AJAX or HTTP requests if you prefer, or if you're unable to use dpd.js. (e.g. for mobile apps)
Note: If you haven't used AJAX much, note that all dpd.js functions are asynchronous and don't directly return a value.
//Won't work:
var comments = dpd.comments.get();
This means that your JavaScript will continue to execute and respond to user input while data is loading, which will make your app feel much faster to your users.
Notice that any comments you add through the app's form are still gone when you refresh. Let's make the form save comments to the database.
Delete these lines from script.js (near line 10, depending on where you put your loadComments() function):
//Clear the form elements
$('#name').val('');
$('#comment').val('');

addComment({
    name: name,
    comment: comment
});
And replace them with:
dpd.comments.post({
        name: name,
        comment: comment
}, function(comment, error) {
        if (error) return showError(error);

        addComment(comment);
        $('#name').val('');
        $('#comment').val('');
});
Add a utility function at the very top of script.js to alert any errors we get:
function showError(error) {
        var message = "An error occurred";
        if (error.message) {
                message = error.message;
        } else if (error.errors) {
                var errors = error.errors;
                message = "";
                Object.keys(errors).forEach(function(k) {
                        message += k + ": " + errors[k] + "\n";
                });
        }

        alert(message);
}
An error object can include either a message property or an errors object containing validation errors.
If you load the page now, you should be able to submit a comment that appears even after you refresh.
In this tutorial, you saw how to create a simple app in Deployd. In the next part (coming soon), you'll see how to secure this app with Events.
The source code for this chapter includes a few extra features. If you're feeling adventurous, try adding them yourself:
put() and del() functions from dpd.js.Let us know if you have any ideas to improve our docs. Open an issue on github, send us an email, or tweet us.
This entire site, including documentation written in markdown is available on github. Pull requests are appreciated!