- {{ term.title || term.reference }}
Deployd modules are 100% compatible with node modules. This means you can install a module with npm from your project's root directory.
cd my-dpd-project
mkdir -p node_modules
npm install my-dpd-module
To find deployd modules available on npm search for dpd.
If you used the Deployd installer, you will need to download node.js in order to use npm.
If you need to use a task manager like Grunt or Gulp for your development environement, you'll have to add a package.json as explained in this page.
You can also install a module from source by putting it in your project's node_modules folder. Even a single file is valid (eg: /node_modules/foo.js).
Because Custom Resource Types can specify APIs very different from a Collection, Dpd.js acts as a generic HTTP library for Custom Resources.
The API for your Resource is automatically generated as dpd.[resource].
Examples:
dpd.emails
dpd.addfollower
dpd.uploads
Note: If your Resource name has a dash in it (e.g. /add-follower), the dash is removed when accessing it in this way (e.g. dpd.addfollower).
You can also access your resource by using dpd(resourceName) as a function.
Examples:
dpd('emails')
dpd('add-follower')
dpd('uploads')
Every function in the Dpd.js API takes a callback function (represented by fn in the docs) with the signature function(result, error).
The callback will be executed asynchronously when the API has received a response from the server.
The result argument differs depending on the function. If the result failed, it will be null and the error argument will contain the error message.
The error argument, if there was an error, is an object:
status (number): The HTTP status code of the request. Common codes include:
message (string): A message describing the error. Not always present.errors (object): A hash of error messages corresponding to the properties of the object that was sent - usually indicates validation errors. Not always present.Examples of errors:
{
    "status": 401,
    "message": "You are not allowed to access that resource!"
}
{
    "status": 400,
    "errors": {
        "title": "Title must be less than 100 characters",
        "category": "Not a valid category"
    }
}
Every function in the collection API returns a promise.
We use the ayepromise library (which follows the Promises/A+ 1.1 specs).
To learn how to use promises, please, refer to this article.
The first callback contains the same result same with the classic callbacks.
The second callback contains the error object as described above.
Here's an example to use promises within dpd.js:
dpd.todos.post({message: "Hello world"}).then(function(todo) {
    // do something with todo
    console.log(todo); // display {id: "###", message: 'Hello world'}
}, function(err) {
    // do something with the error
    console.log(err); // display an error if the request failed
});
dpd.todos.get('1234324324').then(function(todo) {
    // do something with todo
    console.log(todo); // display {id: "###", message: 'Hello world'}
}, function(err) {
    // do something with the error
    console.log(err.errors.message); // display the error message
});
dpd.[resource].get([func], [path], [query], fn)
Makes a GET HTTP request at the URL /<resource>/<func>/<path>, using the query object as the query string if provided.
func - A special identifier, i.e. /me.path - An identifier for a particular object, usually the idquery - An object defining the querystring. If the object is complex, it will be serialized as JSON.fn - Callback function(result, error).dpd.[resource].post([path], [query], body, fn)
Makes a POST HTTP request at the URL /<resource>/<path>, using the query object as the query string if provided and body as the request body.
path - An identifier for a particular object, usually the idquery - An object defining the querystring. If the object is complex, it will be serialized as JSON.body - The body of the request; will be serialized as JSON and sent with Content-Type: application/json header.fn - Callback function(result, error).dpd.[resource].put([path], [query], body, fn)
Makes a PUT HTTP request at the URL /<resource>/<path>, using the query object as the query string if provided and body as the request body.
path - An identifier for a particular object, usually the idquery - An object defining the querystring. If the object is complex, it will be serialized as JSON and passed as the q parameter.body - The body of the request; will be serialized as JSON and sent with Content-Type: application/json header.fn - Callback function(result, error).dpd.[resource].del([path], [query], fn)
Makes a DELETE HTTP request at the URL /<resource>/<path>, using the query object as the query string if provided.
path - An identifier for a particular object, usually the idquery - An object defining the querystring. If the object is complex, it will be serialized as JSON and passed as the q parameter.fn - Callback function(result, error).dpd.[resource].exec(func, [path], [body], fn)
Makes an RPC-style POST HTTP request at the URL /<resource>/<func>/<path>. Useful for functions that don't make sense in REST-style APIs, such as /users/login.
func - The name of the function to callpath - An identifier for a particular object, usually the idbody - The body of the request; will be serialized as JSON and sent with Content-Type: application/json header.fn - Callback function(result, error).Custom Resources may load event scripts to allow you to inject business logic during requests to the resource. For example, the collection resource exposes an event called validate. Given the following todo resource folder:
/my-app
  /resources
    /todos
      validate.js
The collection resource would load the contents of validate.js as the validate event.
Event scripts do not share a global scope with other modules in your app. Instead each time an event script is run, a new scope is created for it.
The following functions and objects are available to all event scripts.
The context of the request. This object contains everything from the request (request, response, body, headers, etc...):
// Example:
if (ctx && ctx.req && ctx.req.headers && ctx.req.headers.host !== '192.168.178.34:2403') {
  cancel("You are not authorized to do that", 401);
}
The entire object is available as a gist here.
If the resource does not implement a custom domain, this will be an empty object. Otherwise this usually refers to the current domain's instance (eg. an object in a collection).
cancel(message, [statusCode])
Stops the current request with the provided error message and HTTP status code. Status code defaults to 400.
cancelIf(condition, message, [statusCode])
cancelUnless(condition, message, [statusCode])
Calls cancel(message, statusCode) if the provided condition is truthy (for cancelIf()) or falsy (for cancelUnless).
A boolean property, true if this request is authenticated as root (from the dashboard or a custom script).
emit([userCollection, query], message, [data])
Emits a realtime message to the client. You can use userCollection and query parameters to limit the message broadcast to specific users.
This custom resource type allows you to send an email to your users.
The Email resource is built on the Nodemailer module for Node.js; much of the documentation on this page is taken from their README.
In your app's root directory, type npm install dpd-email into the command line or download from source. This should create a dpd-email directory in your app's node_modules directory.
See Installing Modules for details.
Before using the email resource, you must go to its Dashboard page and configure it.
These settings are required:
host: The hostname of your SMTP provider.port: The port number of your SMTP provider. Defaults to 25; 587 is also common.ssl: If checked, use SSL to communicate with your SMTP provider. Unneeded for port 587; as it will automatically upgrade to a secure connection.username: The SMTP username for your app.password: The SMTP username for your app.These settings are optional:
defaultFromAddress: A "from" email address to provide by default. If this is not provided, you will need to provide this address in every request.internalOnly: If checked, only allow internal requests (such as those from events) to send emails. Recommended for security.productionOnly: If checked, attempting to send an email in the development environment will simply print it to the Deployd console. To send an email, call dpd.email.post(options, callback) (replacing email with your resource name). The options argument is an object:
from: The email address of the sender. Required if defaultFromAddress is not configured. All e-mail addresses can be plain (sender@server.com) or formatted (Sender Name <sender@server.com>)to: Comma separated list of recipients e-mail addresses that will appear on the To: fieldcc: Comma separated list of recipients e-mail addresses that will appear on the Cc: fieldbcc: Comma separated list of recipients e-mail addresses that will appear on the Bcc: fieldsubject: The subject of the e-mail.text: The plaintext version of the messagehtml: The HTML version of the message// On POST /users
dpd.email.post({
to: this.email,
from: "deployd-server@example.com",
subject: "MyApp registration",
text: this.username + ",\n\n" +
"Thank you for registering for MyApp!"
}, function() {});
This custom resource type allows you to write an event that will run when the resource's route receives a GET or POST request.
In your app's root directory, type npm install dpd-event into the command line or download the source. This should create a dpd-event directory in your app's node_modules directory.
See Installing Modules for details.
The On POST event will be executed when the resource's route (or a subroute) receives a POST request, and likewise with the On GET event.
It is strongly recommended that you reserve the On GET event for operations that return a value, but don't have any side effects of modifying the database or performing some other operation.
If your resource is called /add-follower, you can trigger its POST event from dpd.js:
dpd.addfollower.post('320d6151a9aad8ce', {userId: '6d75e75d9bd9b8a6'}, function(result, error) {
  // Do something
})
And over HTTP:
POST /add-follower/320d6151a9aad8ce
Content-Type: application/json
{
  "userId": "6d75e75d9bd9b8a6"
}
In addition to the generic custom resource event API, the following functions and variables are available while scripting the Event resource:
Sets the response body. The result argument can be a string or an object.
// On GET /top-score
dpd.scores.get({$limit: 1, $sort: {score: -1}, function(result) {
  setResult(result[0]);
});
The URL of the request, without the resource's base URL. If the resource is called /add-follower and receives a request at /add-follower/320d6151a9aad8ce, the url value will be /320d6151a9aad8ce.
// On GET /statistics
// Get the top score
if (url === '/top-score') {
  dpd.scores.get({$limit: 1, $sort: {score: -1}, function(result) {
    setResult(result[0]);
  });
}
An array of the parts of the url, separated by /. If the resource is called /add-follower and receives a request at /add-follower/320d6151a9aad8ce/6d75e75d9bd9b8a6, the parts value will be ['320d6151a9aad8ce', '6d75e75d9bd9b8a6'].
// On POST /add-score
// Give the specified user (/add-score/:userId) 5 points
var userId = parts[0];
if (!userId) cancel("You must provide a user");

dpd.users.put({id: userId}, {score: {$inc: 5}}, function(result, err) {
  if (err) cancel(err);
});
The query string object.
// On GET /sum
// Return the sum of the a and b properties (/sum?a=5&b=1)

setResult(query.a + query.b);
The body of the request.
// On POST /sum
// Return the sum of the a and b properties {a: 5, b: 1}

setResult(body.a + body.b);
This custom resource type allows you to import collections from an existing MongoDB.
Create a project. Then install the dpd-importer module.
dpd create my-app
cd my-app
mkdir node_modules
npm install dpd-importer
dpd -d
In your dashboard - click the green new resource button and choose Importer.
Give the new resource the default name "/importer". Open it by clicking "IMPOTER" in the left menu.
Enter the information of your old MongoDB server. Clicking on Start Import will start creating deployd collections from data in the provided db by streaming data directly from the old db into your new deployd db. The importer will do its best to create properties based on the types it infers from your data.
This custom resource type allows you to store and retrieve files from an Amazon S3 bucket.
In your app's root directory, type npm install s3-bucket-resource into the command line or download the source. This should create a dpd-s3 directory in your app's node_modules directory.
See Installing Modules for details.
Before you can use the S3 Bucket resource, you must set the three properties on its "Config" page:
bucket: The name of your S3 Bucketkey: The security key of your S3 Bucketsecret: The secret key of your S3 BucketThere are two ways to upload files. Both ways require HTTP access; you cannot upload files with dpd.js.
Send a POST request to the url where you want to upload the file, including the file name. Set the Content-Type header to that of the file you are uploading and pass the file's content in the request body.
It will return a 200 OK if the upload was successful. If there was an error, it will return the error directly from S3. This is usually in XML; see Amazon's S3 documentation for information.
POST /my-bucket/README.txt
Content-Type: text/plain
Hello, world!

200 OK
You can upload files directly from a browser using the multipart/form-data type and the <input type="file" /> tag:
<form action="/installer-downloads" enctype="multipart/form-data" method="post">
    <input type="file" name="upload" multiple="multiple" />
    <button type="submit">Upload</button>
</form>
To send a multipart request manually, send a POST request to the url where you want to upload the file, not including the file name. The Content-Type header must be multipart/form-data. Set the request body according to the multipart/form-data standard.
If the upload was successful and there is a Referrer header on the request (e.g. if it was submitted as a form from a browser), the response will redirect to the referrer. Otherwise, it will return 200 OK. If there was an error, it will return the error directly from S3. This is usually in XML; see Amazon's S3 documentation for information.
To download a file, send a GET request to the url where the file exists.
GET /my-bucket/README.txt

200 OK
Content-Type: text/plain
Hello, world!
To delete a file, send a DELETE request to the url where the file exists.
DELETE /my-bucket/README.txt

200 OK
This can also be done with dpd.js:
dpd.mybucket.del('README.txt', function(response, error) {
    // Do something
});
The S3 Bucket Resource has three events:
On Upload: Executed before a file is uploaded to S3.On Get: Executed before a file is downloaded from S3.On Delete: Executed before a file is deleted.The URL of the request. Does not include the resource's name; if the request URL is /my-bucket/README.txt, the url property will be /README.txt.
Only available in On Upload. The size of the file, in bytes.
    // On Upload
    // Set a limit on file size
    if (fileSize > 1024*1024*1024) { // 1GB
        cancel("File is too big; limit is 1GB");
    }
Only available in On Upload. The name of the file that is being uploaded.
    // On Upload
    dpd.uploads.post({ filename: fileName, creator: me.id }, function() {})
Deployd modules can register new Resource Types, which can be created with a route and configured per instance. Deployd comes with two built-in Resource Types: "Collection" and "User Collection".
To add more Resource Types, you can install a module that includes one. The examples on this page use the Event resource.
Once the module is properly installed, you can add the custom resource just like a Collection. Custom Resources will usually have an asterisk icon.
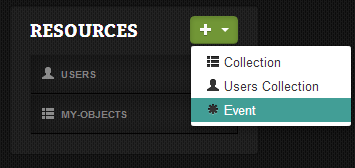
Note: After adding any module, you will have to restart the Deployd server to see its effects. If you don't see the custom resource type in the list, you may have to restart the server and refresh the dashboard.
See the documentation of your Custom Resource Type module for details on configuration options. Most custom resource types implement a "Config" page and an "Events" page.
The "Config" page can take different forms. For very basic modules, it's often a simple JSON editor where you can enter optional values. Others will list their available configuration values in a form.
The "Events" page is similar to the Collection "Events" page.
Depending on the complexity of the custom resource type, it may have different configuration pages.
Let us know if you have any ideas to improve our docs. Open an issue on github, send us an email, or tweet us.
This entire site, including documentation written in markdown is available on github. Pull requests are appreciated!